The Fechino Files: Masonry tool modifications on a tight budget
Written by Steven Fechino
When you work long enough in masonry two things are going to occur: your body is going to be less tolerant of the physical abuse that the job can produce, and your thinking about doing it smarter and more economically will begin to become a normal mindset. Years ago, we did an article in MASONRY magazine on tooltips that were designed to make masonry life easier. Well, some of the old tips are still useful. I will describe several ideas that are not my original ideas, but an accumulation of some very intelligent folks I have had the opportunity to work with.
The rebar handled hammer:
Johnny O’Brian welded a piece of 2-inch round stock to a number 8 piece of rebar and created the hammer that nobody would ever break or steal. This hammer was heavy and without gloves it was mean to your hands. You never had to worry about it slipping out of your hands on a humid Tennessee day as the handle’s rebar pattern was about as thick as your fingers. I am sure this hammer is at the bottom of someone’s toolbox, and they are hoping to only need the hammer sporadically.
The gas can grout bag:
About 20 years ago, we did a paving job where the pavers needed to be grouted once they were laid. It was just easier that way. We began grouting, using a small pump that decided to quit after about a day and a half of work. The solution that allowed us to continue to grout was simple- we took several 2-gallon red plastic gas cans (yes, by the way, they were new) cut the back out of them, and cut the spout at about 1/2 inch. Wet the inside of the grout can, filled it with loose enough grout, and poured the grout into the joints. Clean up was simple, and the work went on like nothing ever happened. The resourceful people that I had on the crew made it happen.
Caulking slickers:
There are those who cannot keep up with their tools and must be trained daily- we all have them, and though we think we can do without them, we cannot. Once in awhile a cube or crate would be found on the jobsite with metal banding. We would cut the banding at 10-inch lengths, put two bends in the banding (similar to a thumb joiner), and round off one or both ends to make disposal caulking slickers for those who could not keep up with their stuff. A bit of grinder touch up and they were ready to go. They got us through when we needed them.
Tuck pointers Hawk:
Sometimes, we would have large tuckpointing jobs where our helpers and apprentices would put material back into the wall. We used the hawk method. Hawks can get expensive, especially when several are required all at once. My superintendent at the time, Rickey Jones, cut sheet metal that he got as scraps from the roofing sheet metal guy, cut them into 12-inch squares, and drilled a hole in the center where he placed an old grinder handle in from the bottom so the mortar could be supported. Yes, there was a small nut on the top of the hawk platform, but since we were training newer guys, the production loss was not measurable. Another great job by someone who was able to be creative with his thinking. By the way, Rickey was a pro at making money on the small jobs!
Mixer Wheel Bearing Saver:
Back before mortar silos, when sand piles were everywhere, our mortar mixers were right smack in the center of all that sand, just like a side job is today. We commonly took off one wheel as a method to prevent theft of our mixers and make it easier to fill our tubs. At that time, we immediately covered both the wheel that remained and the hub of the removed wheel on the opposite side with a large black trash bag, the bearing and hubs were spared the abuse of the constant sand, water, and dust that is part of mixing mortar. I will say it is better to put the lug nuts back on the mixer when you take the wheel off, than, to think that you will easily find them the “night” you finish up your job to pull it back to the shop. Yes, let’s just say it is a really good idea.
Our trade is filled with crazy intelligent craftsmen, great ideas often come from necessity and desire for profitability. This article is a way to say thanks to those who make it happen when the resources are low.
The Fechino Files: The perfect bologna sandwich
 Written by Steven Fechino
So, I was talking with Jerry Painter the other day, it was hot outside and I was taking a break to call Jerry to ask him a question, it seemed like the right thing to do. Our discussion, as usual, was about a masonry issue but since it was 11:50 am our stomachs decided to change the topic. The topic of lunch was easy, going to go get a bologna sandwich, or as we called it a sam-mich!
We began with discussing the rules of the perfect sam-mich, it had to begin with white bread. Wonder bread or bunny bread preferably. No rye or wheat bread was allowed. Next was the lettuce, it had to be from an iceberg head, a big single leaf peeled off the top. Ok, bet your mouth is beginning to water now. We then discussed the bologna. Jerry like is cut on the number 7 at the deli, I was okay with four slices of Oscar Myer low fat.
He gave me a hard time about the low-fat thing. You can add a pickle chip or 5, selecting dill bread and butter preferably. The tomato can be layered, but if it is too thick will cancel out the other ingredients, we settled on about ¼ inch thick slices, about three of them. Some like mustard on theirs, but we agreed wholeheartedly that Duke’s Mayonnaise was the best, not too little, but not too much. It had to be enough that you needed a paper towel to wipe your mouth between bites.
Yes, a paper towel, no cloth napkins are permitted. Here is where it gets real. You cannot, by Code 1234 of the bologna sam-mich council, it states that you cannot eat a bologna sam-mich off of a porcelain plate, it needs to be either a piece of wax paper, a paper towel, or two paper plates stuck together.
The reason for the paper plate is because, with the pickles, mayo, tomato and the bologna, the contents of the sam-mich are slippery in between the bread and therefore require constant tapping of the crust of the sam-mich to the paper plate to hold everything in place, you know, realign the sam-mich.
Otherwise, you will end up with a bunch of ingredients on the plate and miss out on the benefits of the sam-mich. You can have a glass mason jar of ice water, sweet tea, or lemonade to top it off, but you cannot have a cup of coffee, green tea, or beer as that would totally destroy the experience.
Pretzels and chips or Mac and cheese are the best sides for this meal, french fries, salad, and coleslaw are not permitted by the code.
Anyone that knows Jerry already can tell this was a real conversation, so real that I went to the market and picked up a few ingredients so I could make the perfect sam-mich. Go get you some!
The Fechino Files: Mentors
I could discuss the resumes of the following individuals. However, a general statement of how they interact within the industry seemed more appropriate.
A few mentors that are not only personal to me, but hundreds of others are as follows:
 Unfortunately, we lost Sam several years ago, but Sam was an incredible visionary. I have spent time with Sam, showing him how to lay brick in Kansas City VICA competition (before the name changed) and what a good sport he was, working on the NCCER manuals and participating in the National Masonry Instructors Association (NCCER). As Sam became older, he was so proud of the men and women that were part of his company and how well they were able to provide for their families. Sam will forever be a friend to so many.
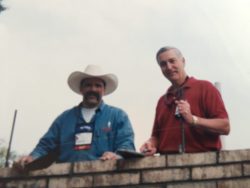
Jerry Painter
 If you ever get to say hello to Jerry, just do! He is friendly and knowledgeable about so many of our trade’s procedures and practices. Jerry is a consultant for the MCAA and is very active with ASTM. Jerry is a good source for “I wonder if this has ever happened to anyone else” type questions, because, if it has happened, Jerry has worked through it a time or two.
 Brian Light is a gentleman craftsman to the finest degree. Brian has served this industry for over 40 years and talks the talk and walks the walk. Brian has journeyman skills like no other and is as humble about it as he can be. Brian once said that he has never cut brick with a trowel, that is what a saw is for. Brian, you are fantastic!
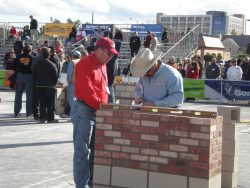 Mike Sutter is another person that you should stop and say hello to, as he is a genuine and nice person that has demonstrated that with masonry knowledge, skill, and a lot of hard work, you can be successful in this industry. Mike was the Rules Judge for the Fastest Trowel Competition that I worked on for almost 10 years, and his ability to interact with folks in our trade is impressive, something I bet most of us try to copy.
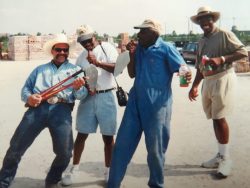 Eugene Johnson second from left, Alonza “AC” Lewis far right
Milton, Curtis Hoover, Eugene Johnson, Ham, and Alonza Lewis all need to be mentioned together. As the founders of the National Masonry Instructors Association, these gentlemen have provided in-class instruction to thousands of young masonry hopefuls. Anyone that has participated in any National Skills USA, VICA, Skills Challenge, or in many cases, local or regional apprentice competitions have run into at least one or all of these gentlemen at the judging level. These are the guys who have dedicated their lives to training and teaching. Thank you, gentlemen.
The Fechino Files: Arches
 Most of us know the basics about building arches, but how many of us can layout the arch, construct the template and build the arch without having a mess to clean up once it is constructed?
Arches are constructed differently from a typical masonry opening. An arch distributes the load of the masonry above with two different forces: one force is the downward pressure that extends into the jamb, the second force is the sideways pressure that is found at the base of the arch and extends to the left and the right of the arch. This pressure is called thrust, and must have the veneer built up simultaneously to the construction of the turned masonry arch units to keep it stable and in place while the veneer cures.
Arch terminology is important to know in order to fully understand how to layout the arch. Many arches require complicated layouts, and today we will discuss two of the simpler, but most common arches found in most of our work.
Some definitions that will simplify the arch layout process:
Abutment: Simply, the masonry that is on the left and right of the base of the arch. This keeps the turned masonry arch units in place and the arch from “kicking out” or failing.
Arch axis: This is the radius that is found in the center of the turned masonry arch. This is not an axis you can see, and it for layout purposes only.
Camber: This is usually found in jack arches (flat arches). It is a slight upward bow that will accommodate loading of masonry veneer units that are placed above the arch. The camber will ensure that the finished arch is not in deflection once the masonry veneer work is in place and cured.
Creepers: These are the fun units to cut when building an arch. Creepers are the units directly on the curvature of the arch found within the veneer.
Crown: This is commonly at the top of the arch found typically at midspan.
Depth: When using brick to turn an arch, this is typically the length of the rowlock or the solider (approximately 4 or 8 inches).
Extrados and Intrados: The upper and lower radius of the arch turned masonry units.
Keystone: This is the unit placed in the center of the crown and typically one of the last units placed when constructing the arch.
Rise of an arch: This is one of the most important dimensions when laying out an arch. This defines the height of the arch from the top of the jamb to the bottom of the arch (intrados).
Skewback: This is where the veneer becomes the arch. Typically begins at the inclined turned masonry units.
Soffit: Sometimes it is an interchangeable word with the intrados. It is another term for the bottom of the arch. Many tradesmen simply call the bottom of the arch the “bottom of the arch”.
Span: There are two definitions for the span. For simple arches, span (S) is simply the rough opening or the distance between the finished veneer of the jambs. This is the way this term will be used in the field. The less used and more complicated definition is when an arch is a larger circular arch and the span (L) is the distance between the ends of the arch axis at the skewback.
Spring line: This this where the soffit of the arch meets the jamb of the masonry below the arch.
Now we can get to the good part.
Laying out an arch is a bit more complicated than creating a radius between the jambs. The type of arch you have to layout will dictate the steps that need to be followed.
Segmental arches are typically just slightly curved above the top of the jambs and are not full half circles. Layout for these arches require you to understand what the rise, radius and span are for the arch.
Here is a formula to calculate the radius of the arch so you can build the template.
(span inches x ½) x (span inches x ½) = T square inches
T square inches /rise inches= S inches (this is distance from bottom of arch and the remainder of the diameter of the arc circle)
T + S= U inches (this is the diameter of the entire arc circle)
U/2 = R is the radius of the arc circle. This is the dimension that you will need to make your template.
Here is an example:
- Span = 60 inches
- Rise = 12 inches
- Radius = (this is what needs to be calculated)
- 60 inches (span) x ½ =30 inches (this is T).
- 30 inches x 30 inches = 900 square inches (T x ½ span = Square inches).
- 900 square inches / 12 inches (rise) = 75 inches (this is S, the diameter of the arc circle – the rise).
- 75 inches (which is the diameter minus the rise) + 12 inches (the rise of the arch) = (this is U, the diameter of the circle). 87 inches is the diameter of the arc circle.
- 87 inches / 2 = 43.5 inches (this is R, this is the radius of the circle). The radius of the circle will be used to construct the template of a Segmental arch, 60 inches in span with 12 inches of rise.
Laying out a semicircular arch is much easier than a segmental arch. Here you need to know the span of the arch and the rise. The radius of the arch is ½ the span and the radius are drawn from the base of the rise on the template.
When building the arch template many of us use plywood at least 5/8 inch, but preferably ¾ inch for the sides of the arch on very large arches. The two circular halves will be parallel and placed together using pieces of 2-inch by 4-inch material. It is always a good idea to use screws to put the arch template together as it can ease removal when scaffolding or other temporary items would interfere with removal of an entire template after the arch is constructed. The top of the template performs well when ¼ inch plywood is used to form a clean radius.
The ¼ inch plywood will absorb water but can be reused for repetitive window openings, making it worth the effort to use. ¼ inch plywood is my preference for the top of the template, but I have seen poster board, cardboard, and carpet turned upside down to form the bottom of the arch. If it works, stick with it. The biggest thing when setting the arch template is to use wedges at the spring line location. The wedges will allow you the ability to drop the template down and make the arch removal easier.
If it is too easy to remove, then the brick at the spring line may end up being a bit out of place and it will show up once everything is cleaned and pointed. Everyone is different when it comes to arch laying preference. I build a better arch when I tuckpoint the bottom of the arch once the form is removed. I feel I can construct the arch cleaner and I do not have to spend nearly as much time cleaning over my head with cleaners. You can butter the entire brick and lay them as a rowlock if you are comfortable with that approach.
When we edited the NCCER Level 3 Masonry Manual, Fourth Edition pages 4-13, we updated and simplified many of the diagrams and text in the arch section. We went into a lot of detail on Jack arches, Gothic arches and even Multicentered arches. If you have any questions, this would be a good point of reference.